


DIFFERENT BUG OUT BAGS FOR DIFFERENT FAMILY MEMBERS

Even if you have a family you will want to have all most essential things in one bag. After that, other family members can have their own bug out bags with personal items and, if not too heavy, some backup items that you also carry in the main bug out bag.
If you are bugging out or even better when you do a bugging out practice with your family and you realize that some family members struggle with the weight of their bags just let them get rid of less important things.
Mobility is the key to move as a unit.
If you have small children, get an off road stroller that you can also take off paved roads into more rugged terrain.
A great multi purpose alternative is a rugged bicycle trailer that can later also be used to transport other gear or resources. This is obviously not very low profile anymore but is often the better solution.
If you can fit everything in your main bug out bag you could also consider a child carrier for yourself or your partner to carry small children.
If you take care of elderly or disabled family members make sure you have a more rugged push-powered wheelchair. Electric wheelchairs are hard to move without being charged.
BOB FAQS
Where to store your bug out bag?
Your bug out bag has to be in an easy to get to location. In the best case, close to an exit of your home. Make sure you camouflage your bug out bag to evade curious questions from people who don’t need to know that you are prepared.
Should I buy a ready made bug out bag?
Most ready made bug out bags come with cheap equipment. A proper bug out bag is also full of equipment that you enjoy using, so assembling all equipment yourself is highly recommended.
How much does a bug out bag cost to create?
A good bug out bag costs some money. It makes sense that you have equipment you can rely on in an emergency situation. Think of it like a mountaineer. Nobody would buy cheap ropes or climbing gear if literally your life depends on it.
I have a limited budget, what items should I spend more money on?
You definitely need a reliable knife, not only in your bug out bag, but as a tool for a multitude of outdoor and survival related tasks.
If possible also invest in an easy to conceal handgun. It does not have to be fancy, it is a tool and just has to work. Well maintained second hand guns are an option.
If you still have some extra money to invest after planning your budget, invest in a high quality sleeping bag and bivy bag. That is of course after you have the proper clothing and shoes to make it to your bug out location.
HYDRATION for a Boug Out Bag

Carry enough water to sustain yourself for your whole journey to your BOL.
3 liters should be fine unless you have to cross very dry or hot areas. Use multiple containers in case one breaks. Even if it is just another container you carry as backup. Keep in mind you can always stuff some equipment into the empty container to use all space (or for example wrap paracord or duct tape around the bottle to take it along). Different containers have also different added benefits.
- Nalgene bottles are durable and not overly expensive. We recommend that you get the 1 liter (32-oz) wide-mouth hard bottles. You can screw them onto many common hand pump filters and if you get the clear version of the bottle you can expose the water you have gathered to UV light and kill off some bacteria and viruses in this way.
- Metal bottles or canteens (such as the popular Klean Kanteen) are durable and don’t weigh much either. The big benefit is that you can cook water in them. A 1 liter or 32-oz version is a great addition to your bag.
- Collapsible soft bottles weigh almost nothing and you can carry a lot of extra water whenever needed. We recommend you get the 3 liter or 96-oz Platypus bottle version to be more flexible about how much water you want to carry. They can also be used as camping showers. Again, it makes sense that you get the clear version to be able to kill off some bacteria and viruses by exposing them to the sun.
WATER FILTRATION AND PURIFICATION
Water is so important for survival so it makes a lot of sense to have several options to filter and purify your water.
- Water purification tablets are a must have for every bug out bag. They are rather cheap and take almost no space or add weight to your BOB. Get silver ion / chlorine dioxide tablets because if used properly they are, unlike iodine or chlorine based tablets, also effective to eliminate giardia and cryptosporidium. The only disadvantage is that it can take 30 minutes to 4 hours to be effective.
- Straw filters are also a great addition to your BOB. They are lightweight, compact, inexpensive and get the job done.
- Bottle purifiers are similar to straw filters, only that they come attached to a bottle.
- Portable water microfilter can filter up to 1 liter (32-oz) of water per minute. They are a bit more expensive and take up some space in your BOB but offer a solid choice to quickly filter bigger amounts of water (if you bug out with several kids for example this might become important). The rubber tube that comes with most of these filters can also be used to get water from hard to reach places or even as an emergency tourniquet.
- Portable electronic disinfection devices such as the Steripen are also good choices to have another option to get clean water. Because they rely on electricity and can break easier than other solution they should be only added as another additional option.
FOOD

Carrying food is optional. You can go for a few days without food, without any problems. If you have just limited space in your bug out bag and want to carry some food, simply get some high calorie and carbohydrate rich energy bars or granola bars and you are good.
Keep in mind that when you are bugging out, most likely you will want to be fast and rest little. So do not take food that takes a lot of time to prepare. We even recommend you do not take any food that takes any time to prepare. Open and eat food is the best.
There are MREs (Meals Ready to Eat) or dehydrated camping meals but they add weight or need time to prepare so they are not the right choice for a bug out bag.
Selco on the food he took out while scavenging
On my trip out from the town my main source of eating was tea and soup. I had some cans with meat but not enough. Sometimes those soups were only hot water with some plants inside, sometimes with some meat.
Important thing is that it was hot meal, and that was very important. Hot soup in that situation probably meant more on psychological level than anything else. It raised my moral more than energy level but in the end that is almost same.
Today I store lot of instant soups and energy bars, they can give you quick meal in short time when you need it and you are bugging out.
FIRE
You will want to have at least three ways to start a fire.
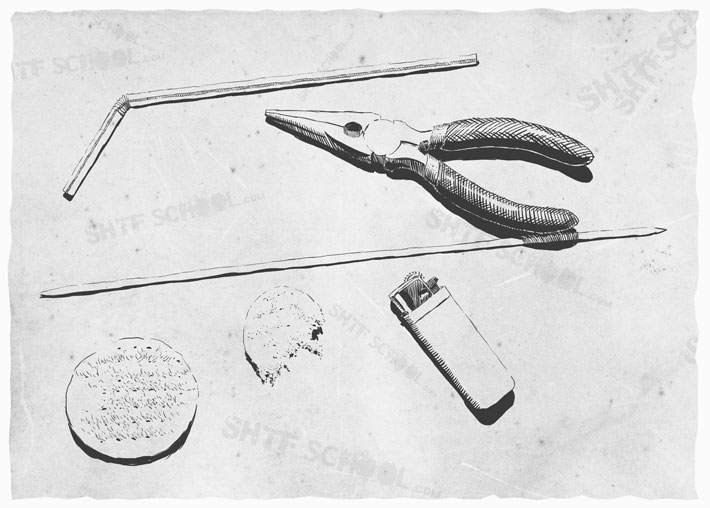
We recommend you carry two mini bic lighter and a small plastic bag or container with some cotton balls soaked in vaseline or any other petroleum jelly.
You can also stuff the soaked cotton into plastic straws that you seal by heating one end of the straw over a flame and then sealing it once the plastic starts to get soft with some pliers. When you want to use your straw fire starters simply cut one of the sealed ends of the straw, take some cotton out and light it.


Most likely this is all you need. Collect some more fuel for your fire, sort it according to size and build a small tepee with the smallest kindling. Light up one of the cotton balls and put it into the tepee. Add the bigger fuel once your fire gets going.
As additional options to start fire we recommend you take a pocket magnifying glass (you can even get credit card sized magnifying cards) and a magnesium fire starter.
Store all your fire making tools in a waterproof container or bag.
As with everything we recommend here, try all items and make sure you know how to start fire even in difficult conditions.
Selco on his fire starting kit
I had few disposable lighters with me all the time. Actually they were not disposable because we refill them by lifting the flame opening with thin steel guard from the same lighter and then refilling it from the bottle.
It was pretty valuable to have lighter in that time. Sometimes it was actually two disposable lighters, one to make spark other with enough gas inside, flint was to small to replace it in other lighter.
Best solution is simplest solution always, so disposable lighter make lot of sense.
CLOTHING

Take clothing that is appropriate for your climate zone. You will want to layer your clothing to get most versatility for different times of the day and night from the clothing you take along. Get durable clothing in muted colors. You do not want to stick out with camouflage patterns but have colors that are well for hiding such as olive green or dark navy or grey colors.
First Layer Underwear:
- Take two pair of wool hiking socks. Wool is durable, maintains insulation properties when wet, breathable, wicks moisture away from the skin and is non flammable. If you spend a bit more for merino wool socks you will also benefit from the antibacterial properties of the wool. Just like shoes, do not go cheap on socks. If you walk for days, the wrong socks can hurt your feet as much as the wrong shoes.
- One more change of underwear. Merino wool underwear is great for this too and available in different thickness for a variety of climates.
- Carry a moisture wicking t-shirt or top in hot and temperate climate zones. Sweat is transported quickly away from your body and can evaporate and cool you down. If you live in a cold climate, wool undershirt and long johns are what you want to have.
Second Layer Insulation / Warmth Layer:
- In hot climates just carry a light long-sleeve shirt that can protect you from sun exposure and insects. In temperate or cold climates, carry a light or heavy fleece jacket. Fleece clothing packs down to a small size and does not weigh much.
- Loose cut outdoor pants. The pants should be rugged and be able to withstand some abuse and dry quickly (forget about jeans, they do not dry quickly!). The loose cut does not restrict your movements in case you have to hide or jump for cover or make any other quick movements.
- A lightweight, crushable boonie hat for warm and temperate climates or a wool beanie for cold climates. We also recommend you carry a thin balaclava in any climate because they can be used as scarf and keep your head warm during the night when you sleep (beanies can be too warm for this).
Third Layer Protection Layer:
- A rain jacket with hood or poncho and / or rain pants. Invest in a good rain jacket with a waterproof but breathable membrane such as Gore Tex, eVent, Sympatex or Omni-Dry. Look for rain protection that does not have any insulation inside to remain flexible. If the weather is cold you can wear more insulation layers over each other or in hot climates you just wear your underwear and rain protection.
- Good quality hiking boots. If you wear shoes that are unsuitable for bugging out most of the time, consider keeping good quality hiking boots along with your bug out bag. These ankle high, waterproof and durable shoes are some of the most important pieces of equipment you have. You will want to keep your feet well protected and working. They are your very basic means of transportation and if you have to fight for your survival you might not have the luxury to simply relax and not move for a couple of days. Test the shoes and make sure they do not cause blisters when walking all day long.
- Heavy duty gloves either insulated for cold climates or not. Just like your feet you want to keep your hands well protected. Get some gloves that you can wear and still do most common things with while keeping them protected.
- Shemagh or large bandana. You can use it to build water filters, as head and face protection, as a first aid arm sling, as a pouch to carry twigs or kindling you have collected or to simply tie things together. It is a great multi purpose item that does not weigh much and does not take much space to take along.
Selco on what kind of clothes he was wearing
I was wearing clothes that I had at that time. I did not have too much choice, so most of the times I had military style (but not military) black jacket and working pants and boots. I was paying attention mostly to blend in, to look not interesting. Most of the time I actually looked very poor like everyone around us.
Today I would choose similar, but more quality stuff, still without looking too “tactical” but actually being tactical.
Clothes in layers, waterproof, with enough pockets and “room” for running and similar, footwear that is durable but still allowing fast movement (running, squatting, etc.).
SHELTER
You lose body temperature through conduction, convection, evaporation, respiration and radiation.
Conduction: You do not want to touch cold surfaces and exchange your body heat to the cold of the surface. Some insulating material absorbs your body heat and radiates it back to you. If you plan on lying or sitting down somewhere, make sure you have a proper insulating layer between you and the ground to keep your body heat.
Convection: Stay protected from wind to avoid the body heat that stays close to your body or trapped within the layers of clothing be blown away. Your outer layer or shelter should protect you from the wind.
Evaporation: When you sweat or water evaporates on your skin you cool down. To prevent yourself from losing water and energy you will want to always stop and change to the appropriate amount of layers of clothing you are wearing to avoid sweating. To stay warm your goal has to be to stay dry at night.
Respiration: You lose a bit of body heat every time you breath in cold air and breath out warm air. You can minimize this by wearing a light Balaclava over your face and pre-warm the air.
Radiation: Our body radiates heat and we use insulating layers to trap this radiation and keep us warm. Down feathers work so well for that because they have so many fine hairs that can trap the heated air very effectively. Your head is a major source of heat loss through radiation so keep it covered whenever you are getting cold. Also keep in mind that heat rises up when you build your shelter. To preserve this heat, some snow shelters let you sleep elevated and give the colder air a place to sink into.
Shelter Options
The most basic shelter is your clothing. You can cut a cheap sleeping pad just big enough to sit on and simply lean on a tree or rock to rest. You use your clothing to protect you from the environment.
If you look for insulating sleeping pads or mats you can get versions that are air filled or made out of foam or combinations of both.
The air filled versions are very comfortable, pack down to small sizes but are not very durable. The foam pads can not be packed down to such small sizes but also can not be pierced and lose their ability to insulate you like air filled ones. Foam pads also offer the advantage that you can cut them to a size that is suitable for you.
Many lightweight backpacker simply use a pad for their upper body. Hybrids are also interesting options. They offer the comfort of air filled mats as long as they work, self inflate almost completely and still offer some insulation if the shell is pierced.
A space blanket can be used to help you keep your body heat. There are also emergency bivvys made from space blankets that you can get your full body in just like sleeping bags. But keep in mind, the material of space blankets is very thin and breaks easily. They are really just an emergency option as shelter and good for just a few nights.
A sleeping bag and a waterproof liner or bivvy bag is another option for sleeping outside. You can also get more expensive sleeping bags that already have some form of water resistance in the outer layers.
If you live in an area with temperate or cold climate you might want to add a sleeping in any case. Different sleeping bags come with different temperature ratings. A good year-round rating is 30-40F degree (or 5-0C). To carry less and save some space go for a mummy style sleeping bag that gets tighter in the leg and foot area.
Use compression sacks to make the sleeping bag as small as possible when carrying in your bag but keep in mind for long term storage that you want to store your sleeping bag uncompressed to avoid harming the down feathers or insulation fibers.
Down sleeping bags offer better insulation with less weight and can be compressed more than sleeping bags filled with synthetic fibers but they lose their ability to keep you warm once they are wet.
Sleeping bags filled with synthetic fibers are cheaper, heavier, need a bit more space but can still keep you a bit more warm when they are wet. We recommend you go for a down sleeping bag stored in a waterproof compression sack if this is within your budget.
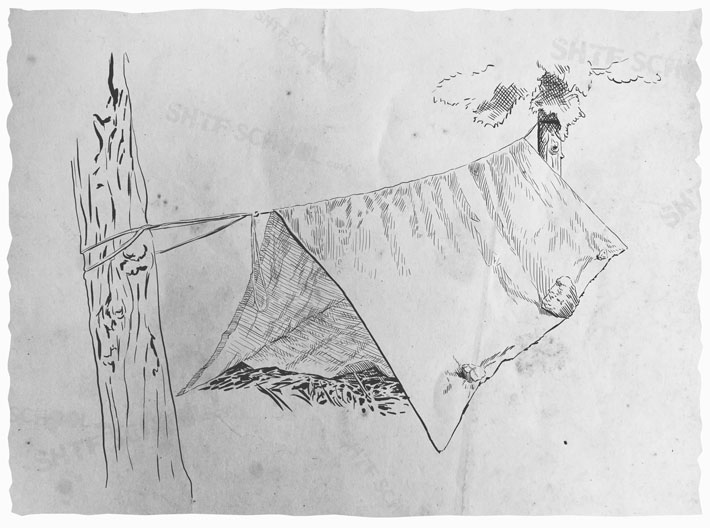
The next step up is using a poncho or tarp to create a basic lean to shelter, ridge line lean to or center ridge line shelter. You will want to have an insulating layer you can rest upon. You can use the sleeping pad, space blanket or use some dry twigs, moss or leaves to create a layer that insulates you from the cold ground.
Practice setting up tarps and practice sleeping outside with this minimal equipment.
You have to be aware of the direction from where the wind comes and know how close or far you can make a fire to keep your shelter warm throughout the night.
A tarp is a great multi purpose item, does not weigh much and does not take much space to carry. You can use it to catch rain, as a ground sheet to sit or sleep on, as a sling pack to carry things, create makeshift hammocks with it or even emergency stretchers.

A tarp or open shelter does not prevent insects from getting to you and during heavy rain your space might also get flooded. A lightweight tent is another option.
Try to get a tent that is easy to setup, even in low light conditions. Free standing (most of the dome tents) tents can help you to set up your tent in areas with loose or rocky ground. As with everything, practice setting up your tent under difficult conditions such as during rain, heavy wind or snow.
Another excellent solution are hammocks if you stay in an area with trees. The big benefits of hammocks are, you do not need flat ground to create your shelter, you do not leave a footprint of your shelter behind and they are easy and fast to set up and pack. Depending on the climate you will still need an insulating layer or quilt for the hammock.

Getting a quality hammock with insect net and a tarp you can put above it, is a great solution for people living in areas with trees. The tarp itself can be used in case there are no suitable trees to set up the hammock.
Picking a shelter depends on your budget, level of comfort that is acceptable for you and the space and weight.
Just keep in mind that you want to keep your bug out bag small and lightweight. If you have to decide to either take a sleeping bag or a tent, pick the sleeping bag. We recommend you carry at least a tarp, some paracord (or nylon rope) and a space blanket in your bug out bag and practice setting up a shelter with them.
Selco about heavy duty trash bags as shelter
You can use heavy duty trash bags as tarp, poncho, ground sheet for your shelter, water collection device, floatation device if you fill it with air and sleeping bag if you fill it with isolation material such as dried leaves.
Have several of them and it is important that they really heavy duty ones. Sometimes you will use trash bag simply as a primitive rain coat, or cover for your backpack. But also it can be life saver as a membrane between you and wet ground for example.
Heavy duty trash bags are for shelters, what leatherman is for small tools.
BUG OUT BAG CHECKLIST

FOOD
SHELTER
FIRE
WATER
- Canteen or bottle (wrap paracord and / or duct tape around your water bottles as a convenient way to take them along.)
- Water treatment solution
- Hydration reservoir
- Purification devices such as straw filter or hand filter
MISCELLANEOUS
- Signal mirror
- Head lamp
- Whistle
- Paracord
- Survival knife
- Multi-Tool
- Duct tape
- Spork
- Compass
- Backup batteries for your phone (or battery pack for charging it)
- Small (hand crank) AM/FM radio
- Sewing kit
- Super glue
- Map(s)
- Important documents (or copies of them)
- Kindle tablet charged and loaded with reference books (such as drug information and survival manuals)
WEAPONS
- Handgun(s)
- Pepper spray
- Ammunition
- Rifle(s) (in case being low profile isn’t important, another option are collapsible rifles such as the AR-7 or M6)
FIRST AID
You can start out with a store bought first aid kit and then add more things to it. Here are some things you should have:
- Adhesive bandages in a variety of sizes
- Antiseptic wipes
- Sterile gauze pads and roll bandage
- Medical tape
- Moleskin or other blister patches
- Tweezers (to remove splinters and dirt from wounds)
- Elastic bandage with velcro closure (for muscle sprains and strains, can also be used to fix splints in case of broken bones)
- Battle dressing
- Sterile gloves
- Sun screen (if you might be exposed to the sun while bugging out)
- Tourniquet
- Blood stopper (such as quikclot or celox)
- Chest seal (for penetrating trauma wounds of the chest)
- Trauma shears / EMT scissors (to cut clothing)
You can use medical tape and antiseptic wipes and not take adhesive bandages. A high quality medical tape can be used in a variety of ways and it let’s air get to the wound.
The antiseptic wipes usually dry out within hours of putting them on a wound and the medical tape can hold them better in place than most adhesive bandages can. Another benefit is that you can create big or small adhesive bandages with this system and also cover areas that are usually hard to get to.
MEDICINE
- 1 – 3 month supply of any personal medication (depending on size)
- Antibacterial cream, Iodine drops
- Cream to treat burns
- Antihistamine cream
- Antibiotics: Ointment to treat cuts and wounds, Amoxicillin, Ampicillin, Ciprofloxacin, Azithromycin, Cephalexin, Doxycycline, Metronidazole (Some of those will be hard to get. Google for fish antibiotics and other antibiotics for animal use. Make sure to educate yourself before taking any medicine without medical supervision!)
- Anti diarrhea medicine such as Imodium is good for short term scenarios, do not use it in long term scenarios. Diarrhea should come out, because the body tries to expel some micro organism.
- Pain relief: Ibuprofen, Aspirin, Acetaminophen
- Enhancement drugs: Vyvance, Adderall (this is controversial, do your own research on it and only get them if they are legal to use where you are)
In general make sure you know the drugs you take along. You do not want to have any adverse reactions or unexpected problems while bugging out.
HYGIENE
- Wet wipes (great for cleaning yourself on the road)
- Small soap bar
- Hand sanitizer
- Roll of toilet paper (remove the cardboard and put it in a ziplock bag)
- (Female hygiene products)